Taking screenshots on Windows is an essential skill for productivity, communication, and documentation. Whether you are saving important information, capturing an error message for technical support, or sharing something from your screen, knowing how to screenshot on Windows keyboard makes everyday computer use much easier. Windows 10 and Windows 11 both offer multiple built-in keyboard shortcuts that allow users to capture screenshots instantly without installing any additional software.
This guide explains every important method in detail, including basic shortcuts, advanced capture tools, saving options, and troubleshooting tips. It is designed to help beginners as well as advanced users understand how Windows screenshot tools work and how to use them effectively for different tasks.
Understanding How the Windows Screenshot System Works
Windows screenshot functionality is built directly into the operating system, allowing users to capture images of their screen in different ways depending on their needs. When you learn how to screenshot on Windows keyboard, you are essentially learning how to use built-in capture functions that either copy an image to your clipboard or automatically save it to your device. These functions are designed to improve workflow efficiency and make screen capturing quick and accessible.
The screenshot system in Windows works in two main ways: clipboard capture and automatic file saving. Clipboard-based screenshots require you to paste the image into an application like Paint or Word before saving, while automatic saving stores the image directly in a folder on your computer. Understanding this difference is important because it affects how quickly you can access and use your screenshots in daily tasks.
Another important aspect of the Windows screenshot system is flexibility. Windows allows users to capture the full screen, a single active window, or a selected area. This flexibility ensures that users are not limited to one type of capture and can choose the most appropriate method depending on the situation, such as creating tutorials, saving receipts, or capturing specific application windows.
Essential Keyboard Shortcuts for Screenshots on Windows
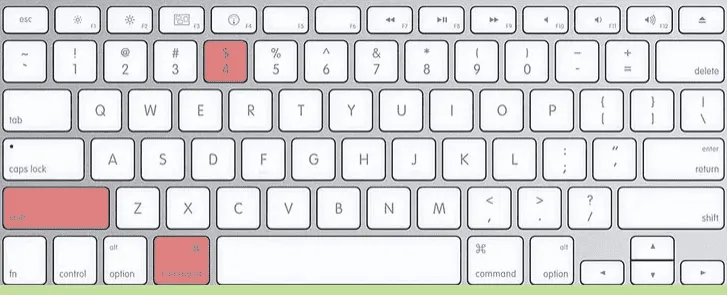
One of the most commonly used methods for how to screenshot on Windows keyboard is the Print Screen key, often labeled as PrtScn. When you press this key, Windows captures the entire screen and copies it to the clipboard. You can then open an application like Paint, press Ctrl + V, and save the image. This method is simple and widely used, especially for quick screenshots that do not require immediate saving.
A more advanced shortcut is Windows key + PrtScn, which automatically captures the full screen and saves it as a file in the Pictures > Screenshots folder. This method is extremely useful for users who take frequent screenshots because it eliminates the need to manually paste and save each image. It also keeps your screenshots organized in a dedicated folder, making them easier to locate later.
For capturing only the active window, you can use Alt + PrtScn. This shortcut is helpful when you only want to capture a specific application without including the entire desktop. The image is copied to the clipboard, allowing you to paste it into an editor for saving or editing. These essential shortcuts form the foundation of learning how to screenshot efficiently on Windows systems.
Advanced Screenshot Methods and Snipping Tool Features
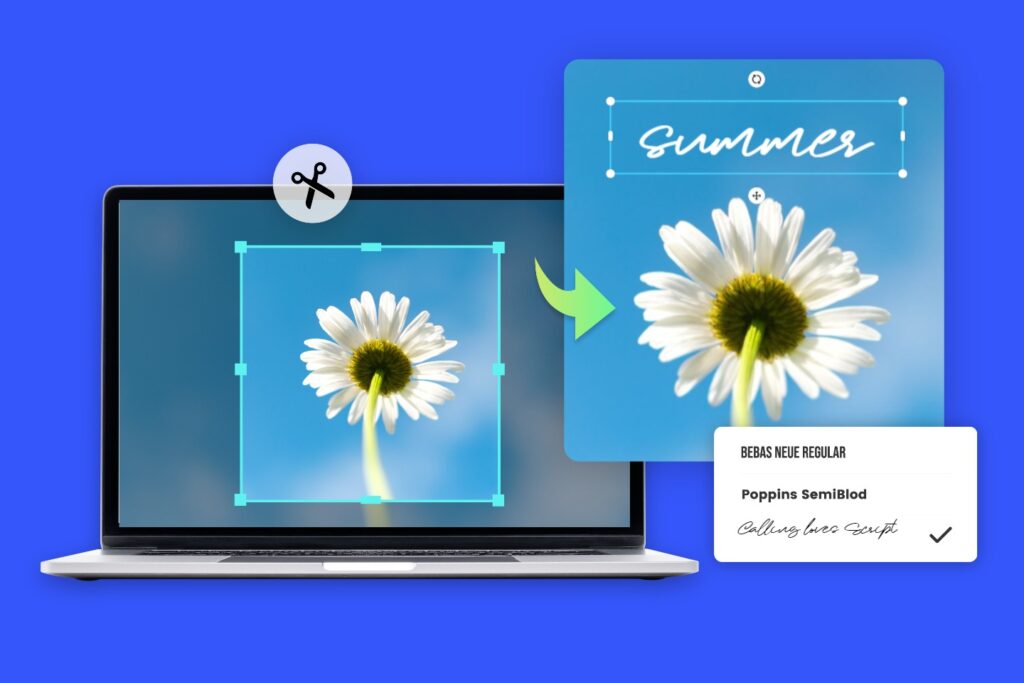
Beyond basic shortcuts, Windows offers advanced tools that give users more control over screenshots. One of the most powerful methods is Windows key + Shift + S, which opens the Snipping Tool overlay. This tool allows you to select a custom area of your screen using rectangular, freeform, window, or full-screen capture modes. It is ideal for precision screenshots where only a specific section is needed.
The Snipping Tool in Windows 10 and Windows 11 also provides editing capabilities. After capturing a screenshot, users can annotate, highlight, or crop the image before saving or sharing it. This makes it especially useful for work-related tasks, tutorials, or collaborative communication where visual explanation is required. The captured image is copied to the clipboard and can also be saved manually for future use.
Another advanced feature is delayed capture, which allows users to take screenshots after a few seconds. This is useful when capturing menus, dropdowns, or temporary on-screen actions that disappear quickly. The Snipping Tool has become the modern replacement for older screenshot methods and provides a more flexible and powerful experience for users who want more control over how they capture their screen.
Saving, Editing, and Managing Screenshots Efficiently
Understanding how to screenshot on Windows keyboard is only part of the process; managing screenshots effectively is equally important. When using clipboard-based methods like PrtScn or Alt + PrtScn, users must paste the screenshot into an editing tool such as Paint before saving it. Once pasted, the image can be cropped, resized, or annotated, and then saved in formats like PNG or JPEG depending on the user’s needs.
For automatically saved screenshots, Windows creates a dedicated Screenshots folder inside the Pictures directory. This helps users keep their captures organized without manually naming or sorting files each time. Over time, however, this folder can become cluttered, so it is a good practice to regularly organize or move screenshots into categorized folders for better file management.
Editing screenshots is also an important step for many users. Windows allows basic editing through built-in tools, but third-party applications can provide more advanced features like annotations, arrows, blur effects, and image enhancement. Efficient management and editing ensure that screenshots are not just stored but also used effectively for communication, documentation, or professional purposes.
Troubleshooting and Expert Tips for Better Screenshots
Sometimes users face issues while learning how to screenshot on Windows keyboard, especially when shortcuts do not work as expected. One common problem is that the PrtScn key may not function properly on laptops without pressing the Fn key. In such cases, using Fn + PrtScn or Fn + Windows key combinations may be necessary depending on the device manufacturer.
Another common issue is confusion about where screenshots are saved. If the Windows key + PrtScn shortcut is used, screenshots are automatically stored in the Pictures > Screenshots folder. However, if only PrtScn or Alt + PrtScn is used, the image is stored temporarily in the clipboard and must be pasted manually. Understanding this difference helps prevent confusion and ensures users do not think their screenshots are missing.
For better screenshot performance, users can also customize Windows settings. In newer versions of Windows, it is possible to configure the Print Screen key to open the Snipping Tool directly. This provides faster access to advanced capture options. Additionally, using built-in tools like the Game Bar (Windows key + G) can improve screenshot capabilities, especially for gaming or full-screen applications.
Final Thoughts on Using Windows Screenshot Shortcuts Effectively
Mastering how to screenshot on Windows keyboard significantly improves productivity and makes it easier to capture and share information. Whether you are using basic shortcuts like PrtScn, advanced combinations like Windows key + Shift + S, or built-in tools like Snipping Tool, each method serves a different purpose and offers unique advantages depending on your needs.
By understanding the full range of screenshot options available in Windows 10 and Windows 11, users can choose the most efficient method for any situation. With proper practice, these shortcuts become second nature, allowing you to capture, edit, and manage screenshots quickly and effectively in both personal and professional environments.
You may also read: How to Make Pancakes Step by Step – Easy UK Recipe for Fluffy Results