
Paper bag snowflakes are one of the easiest and most impressive DIY decorations you can create for the holiday season. Using simple materials and a few easy steps, you can transform ordinary paper bags into large, beautiful snowflakes that add warmth and charm to your home. This craft is beginner-friendly, affordable, and perfect for families, classrooms, or anyone who enjoys handmade décor.
Unlike store-bought decorations, paper bag snowflakes allow you to customize size, color, and design. Whether you want rustic brown snowflakes, elegant white ones, or colorful festive variations, this craft offers endless possibilities. In this guide, you will learn exactly how to make paper bag snowflakes step by step, plus tips, design ideas, and common mistakes to avoid so your decorations turn out perfectly.
What Are Paper Bag Snowflakes?
Paper bag snowflakes are decorative shapes created by gluing multiple paper bags together, cutting patterns, and opening them into a circular snowflake design. This craft is inspired by traditional paper snowflakes but adds dimension and volume. Because several bags are layered, the final result looks fuller and more impressive, making it ideal for hanging on walls, windows, or ceilings.
The popularity of paper bag snowflakes has grown significantly because they are simple, affordable, and visually striking. Many people enjoy making them during the Christmas season, but they can also be used for winter parties, classroom decorations, and festive events. The materials are easy to find, and the process is quick, which makes this craft suitable for beginners and experienced DIY enthusiasts alike.
Materials You Need to Make Paper Bag Snowflakes
To make paper bag snowflakes, you only need a few basic materials. Most of these items are already available at home, which makes this project budget-friendly. You will need 7 to 9 paper bags of the same size, scissors, glue, and string for hanging. A hot glue gun can make the process faster, but a regular glue stick also works well for beginners.
Choosing the right type of paper bag helps improve your final result. Brown kraft bags create a rustic look, while white bags offer a classic snowy appearance. You can also use colored bags for a more festive style. Make sure all bags are identical in size and shape, as uneven bags may cause the snowflake to open incorrectly or look unbalanced once completed.
Step-by-Step Guide: How to Make Paper Bag Snowflakes
Start by stacking your paper bags neatly on top of one another, ensuring they all face the same direction. Apply glue in a “T” shape on the first bag, drawing one vertical line down the center and one horizontal line along the bottom. Place another bag on top and press firmly. Continue this process until all bags are glued together. Allow the stack to dry briefly so the layers hold properly before moving to the cutting stage.
Next, cut your desired snowflake pattern. Trim the top corners to form a pointed shape, and cut small designs along the edges such as triangles, curves, or diamond shapes. Once finished, gently fan the stack open into a circular snowflake. Glue or tape the final edges together to secure the shape. Add string at the top if you want to hang it, and your paper bag snowflake is ready for display.
Design Ideas and Variations
One of the best things about paper bag snowflakes is the ability to experiment with different designs. You can create simple snowflakes with minimal cuts or intricate ones with detailed patterns. Try cutting curved edges for a softer appearance or sharp triangles for a bold, geometric look. Mixing white and brown bags in one stack can also create interesting layered effects.
You can also vary the size by using larger or smaller paper bags. Smaller bags create delicate decorations, while larger ones produce dramatic statement pieces. Some people add glitter, paint, or metallic accents to enhance their snowflakes. These variations allow you to match your decorations with your overall Christmas theme and create unique handmade pieces every time.
Tips for Best Results
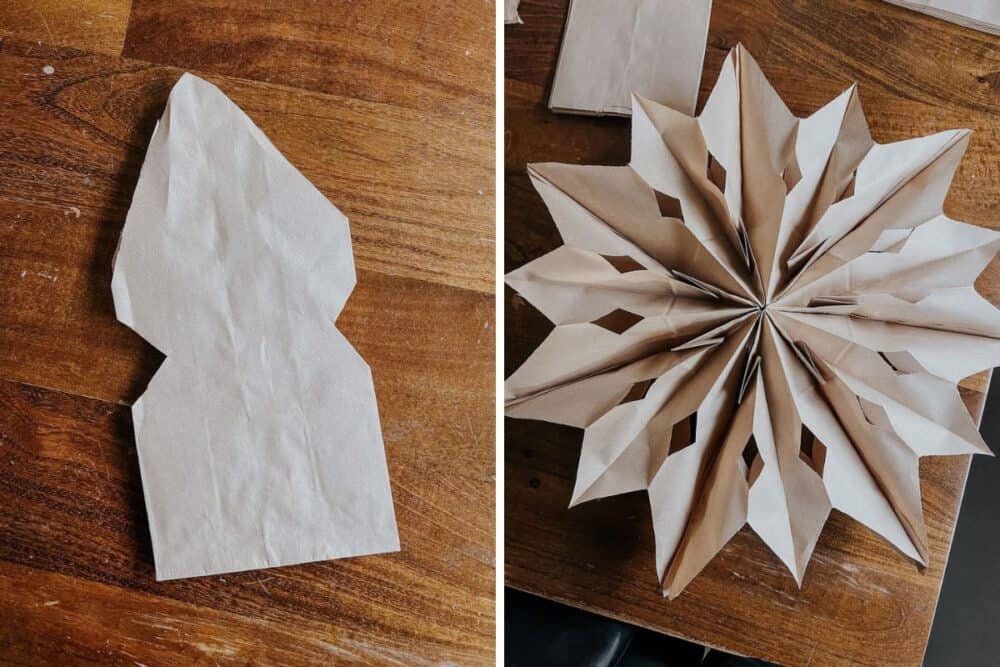
For the best outcome, ensure that your paper bags are aligned perfectly before gluing. Misaligned edges can cause the snowflake to look uneven when opened. Use sharp scissors for clean cuts, as dull blades may tear the paper and affect the final design. It is also helpful to test one snowflake first before making multiple decorations.
Another useful tip is to avoid adding too much glue, as excess adhesive can make the bags stick unevenly. If you want to store your snowflakes after the holiday season, use tape instead of permanent glue when closing the final edge. This allows you to flatten the snowflake and reuse it next year without damaging the design.
Decorating With Paper Bag Snowflakes
Paper bag snowflakes are versatile decorations that can transform any space into a festive winter setting. You can hang them from ceilings, attach them to walls, or display them in windows. Grouping several snowflakes together at different heights creates a dramatic and visually appealing effect. They also look beautiful above dining tables or along staircases.
Another creative idea is to combine them with fairy lights for a magical glow. You can also attach them to garlands or use them as part of a holiday backdrop. Because they are lightweight, they are easy to hang using string, tape, or thumbtacks. This flexibility makes them perfect for both home decorating and event styling.
Common Mistakes and How to Fix Them
One common mistake is using too few paper bags, which can result in a snowflake that looks thin or incomplete. Using at least seven bags ensures a fuller design. If your snowflake does not open properly, it may be due to uneven gluing. In this case, gently separate the layers and add additional glue where needed before reopening.
Another issue is cutting too much from the sides, which can weaken the structure. Try making smaller cuts for better stability. If the edges do not stay together, use tape, glue, or a stapler to secure them. These small adjustments can help you achieve a professional-looking paper bag snowflake without starting over.
Why Paper Bag Snowflakes Are Eco-Friendly
Paper bag snowflakes are a sustainable decoration option because they reuse everyday materials. Instead of buying plastic decorations, you can create beautiful designs using recyclable paper bags. This reduces waste and encourages creative reuse of items that might otherwise be discarded.
Additionally, these snowflakes can be flattened and stored for future use. This makes them reusable and environmentally friendly. Choosing biodegradable materials also supports eco-conscious decorating, which is becoming increasingly popular among households looking for greener holiday solutions.
FAQ About Paper Bag Snowflakes
Many people wonder how many bags are needed to create a snowflake. Typically, seven to nine bags work best for a full design. Using fewer bags may result in a thinner snowflake, while more bags create a larger and denser appearance. The number you choose depends on your preferred style and bag thickness.
Another common question is whether children can make this craft. Yes, paper bag snowflakes are suitable for kids with supervision, especially when using scissors. Many also ask how long the process takes. Most snowflakes can be completed in about 10 to 15 minutes, making this a quick and enjoyable DIY project. You can also reuse them by flattening and storing carefully after the season ends.
You may also read: White Wood Stain: Best Products, Techniques & Finishes for a Modern Look